MCP server
You want your coding agent to read your findings, resources and scans itself, instead of you pasting them into chat. The Dwaar console is also an MCP server: add its address to your agent, approve it once in your browser, and the agent calls Dwaar's tools as you, never with more than your role allows.
This page sets it up from the console. For the plugin that adds Dwaar's skills, and the whole path from an empty tenant to a fixed finding, see Connect a coding agent.
Before you start
- A Dwaar account with your work email, to open the console. No account yet? Connect a coding agent starts without one and creates it on the way.
- A coding agent that supports remote MCP servers that sign in with OAuth. Claude Code, Codex, Cursor, VS Code, Gemini CLI and OpenCode all do.
- A role that can read something the tools return. Every built-in role can except Billing admin. Viewer and Auditor can approve Read only but not Read and write.
Step 1: Copy the command from the Installation hub
- In the console, open Installation hub, then the MCP server tab.
- In the MCP server for coding agents card, find your agent and copy its command with the copy button.
- Run it in a terminal. For Cursor, put the JSON in
~/.cursor/mcp.jsoninstead.
The commands already carry your console's MCP address, which is the console's address followed by /mcp. On the shared console that is https://console.stg.dwaar.ai/mcp. There is no token to copy: the agent signs in with your account in the next step.
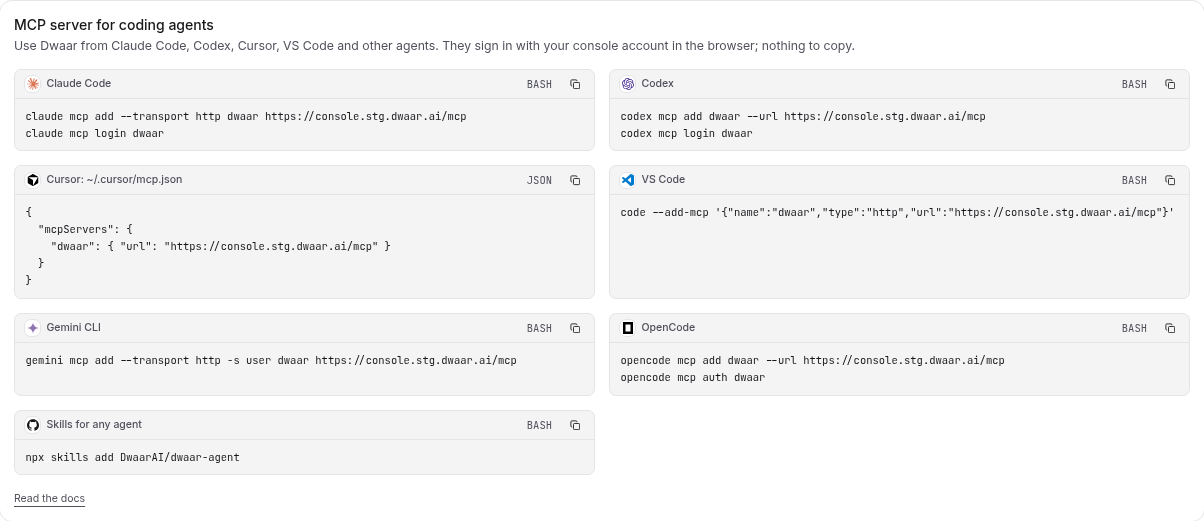
The last command in the card, npx skills add DwaarAI/dwaar-agent, adds Dwaar's skills to any agent. The server gives the agent tools; the skills teach it what to do with them, such as reviewing the repository you are in. Add both.
Step 2: Sign in and approve
Start the sign-in from your agent. For three of them it is the second line of the command you copied.
| Agent | How it signs in |
|---|---|
 Claude Code | claude mcp login dwaar, or run /mcp in Claude Code, choose dwaar, then Authenticate. |
 Codex | codex mcp login dwaar |
 Cursor | Cursor shows Needs login next to dwaar in its MCP settings. Choose Connect. |
 VS Code | It asks you to sign in the first time a Dwaar tool runs. |
 Gemini CLI | Run /mcp auth dwaar in Gemini CLI. |
 OpenCode | opencode mcp auth dwaar |
If you installed the Claude Code plugin instead, the server is called plugin:dwaar:dwaar, so sign in with claude mcp login plugin:dwaar:dwaar.
Your browser opens. If it is already signed in to the console, it goes straight to the consent page. Otherwise you sign in first, with your work email; personal addresses such as Gmail are refused. Someone whose company has no Dwaar tenant yet is asked to Create your organization before the consent page, the first time only.
The consent page names the agent, the person and tenant you are signed in as, and where the access goes. For an agent on your laptop that is "an app on this computer". Then it asks what the agent may do.
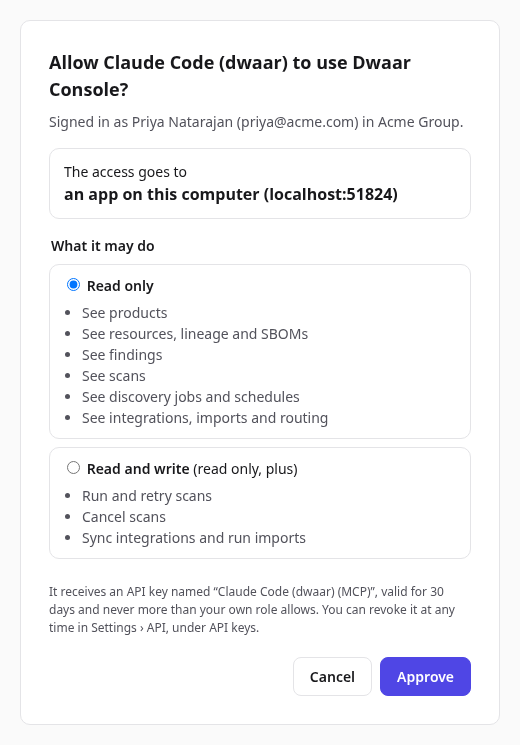
| Choice | What the agent may do |
|---|---|
| Read only | See products, resources and their components, findings and how to fix them, scans, discovery jobs and connections. This is the default. |
| Read and write | Everything in Read only, plus run, retry and cancel scans, sync a connection to run its discovery now, and triage findings: waive them, revoke waivers, change their severity and comment on them. |
Start with Read only. Choose Read and write when you want the agent to rescan a repository after a fix, which is the one thing that proves the fix worked, or to triage findings for you. The page offers Read and write only when the agent asks for it and your role holds some of it.
Choose Approve, and the agent is connected. It holds an API key named after the agent with "(MCP)" after it, lasts 30 days, and never holds more than your role. Lose a permission in the console and the agent loses it on its next call.
Some things are never tools, whatever you choose: deleting anything, administration, and connecting an integration. When the agent needs a new connection, it sends you to Integrations in the browser, so credentials never pass through chat. What the agent can and cannot do lists every tool and the permission it needs.
Step 3: Check it works
Ask your agent:
Who am I in Dwaar?
It calls the session tool, which answers with your name and your tenant, and whether the tenant is still empty. If the agent greets you by name, it is connected. If it says Dwaar needs authentication, go to Troubleshooting.
Let the agent fix a finding
With Read only, the agent can ask Dwaar how to fix a finding with findingRecommendation. It answers with a summary, the steps, and a prompt for a coding agent. Dwaar tells the agent to read the recommendation, follow its steps in the code, then run rescanResource, which needs Read and write.
Get Dwaar's recommendation for finding <id>, fix it in this repository, then rescan.
Let the agent triage findings
With Read and write, and findings:update on the finding's organization, the agent can change findings:
| Tool | What it does |
|---|---|
waiveFinding | Mark a finding accepted risk or a false positive, with a reason and an optional expiry |
unwaiveFinding | Revoke a waiver, with a reason |
overrideFindingSeverity | Set the severity to critical, high, medium, low or info, or clear it, with a reason |
commentFinding | Add a comment of up to 4,000 characters. Comments are permanent. |
Every change needs a reason of 20 to 2,000 characters. Dwaar tells the agent to read the finding and its history first, and to give a reason a security reviewer can check: what it looked at, such as the code path, the call sites, the deployment, a VEX statement or a compensating control, what it found, and why that justifies the change. It tells the agent never to change a finding to lower a count or without evidence, to comment when unsure, to lower the severity rather than waive when the risk is reduced but not gone, and to set an expiry on accepted risk a fix will remove.
Try it:
Review the open critical findings in acme/payments-api. For each one you can prove is not exploitable here, lower its severity or waive it with the evidence; otherwise add a comment.
Everything the agent decides shows in Findings › Decisions and in the finding's Decisions section, marked AI agent (MCP) with the agent's key name, such as "Claude Code (MCP)". It's also in the audit log, with the key as the credential.
Revoke access
Open Settings › API and find the key in the API keys list, named after the agent with "(MCP)" after it. Choose Revoke. The agent loses access on its next call, and has to sign in again to get it back.
There is no refresh. When the 30 days are up, the agent asks you to sign in again, and you approve a new key.
Dedicated tenants
The shared console is https://console.stg.dwaar.ai, and it is the default. A customer with a dedicated tenant has its own console and MCP addresses, which may be on different domains. Use a dedicated address only if Dwaar gave you one.
The Installation hub always shows your own console's MCP address, so its commands are right on either. The Claude Code plugin carries the shared address, so on a dedicated tenant add the server with the hub's command and the skills with npx skills add DwaarAI/dwaar-agent.
Headless use
CI jobs and claude -p cannot open a browser to sign in. Give them an API key instead, sent as Authorization: Bearer dwc_….
-
Create the key in Settings › API with the Read only (MCP) preset. For a pipeline, create it for a service account, so it does not stop working when you leave. Service accounts and API keys walks through both.
-
Add the server with the key. In Claude Code:
claude mcp add --transport http dwaar https://console.stg.dwaar.ai/mcp \--header "Authorization: Bearer dwc_…"In Codex, keep the key in an environment variable and name it:
codex mcp add dwaar --url https://console.stg.dwaar.ai/mcp --bearer-token-env-var DWAAR_API_KEY
On a dedicated tenant, use the address the Installation hub shows. The key decides the tools, as on the consent page. For a headless agent that triages findings, create a Custom key with findings:read and findings:update. Keys made before findings:update could be held by keys don't gain it: a key keeps the permissions chosen when it was made. Treat it like a password: anyone holding it can do what it allows.
Troubleshooting
| You see | Why | What to do |
|---|---|---|
| The agent says Dwaar needs authentication, or a call fails with 401 | It has not signed in yet, or its key expired or was revoked. | Run your agent's sign-in from Step 2 again. |
| Cursor shows Needs login | Same as above. | Choose Connect. |
| Ask for an invite | Your company already uses Dwaar. | Ask one of its administrators to invite you, then sign in again from the agent. |
| Use your organization email | You signed in with a personal address. | Choose Sign out, then sign in with your work email. |
The write tools, such as rescanResource or waiveFinding, are missing | You approved Read only. | Sign in again from the agent and choose Read and write. The earlier key stays valid until it expires or you revoke it. |
A change to a finding fails with validation | The agent's reason is shorter than 20 characters, or longer than 2,000. | Ask the agent to say what it checked and what it found. |
| The consent page offers only Read only | Your role holds none of the write permissions. | Ask for a role with scans:run if you want the agent to rescan, or findings:update if you want it to triage findings. |
| This sign-in cannot continue | The request was wrong, or it expired. | Start again from the agent. |
Any other error carries a request id after "Ref". Troubleshooting explains each error code.
Try this next
Open a repository you work on and ask the agent which of its open findings it would fix first, and why. Then add the skills from Connect a coding agent, which turn that answer into a review, a fix in the code in front of you, and a rescan that proves it.