Triage findings
Triage fails in two ways. Either nobody decides, and the list only grows, or somebody decides and nobody can find out why six months later.
Dwaar's answer is that a decision is a record. Every change to a finding needs a reason: a waiver, a revoked waiver and a new severity. The reason stays on the finding's history and in Findings › Decisions. Here's how to work through the list.
Prerequisites
findings:readto see findings.findings:updateon the organization that owns the resource, to waive a finding, set its severity or comment on it.findings.settings:updateto ignore a check or change a check's severity. This one applies across your whole tenant.
Without findings:update, the panel shows the status and severity read-only, and offers no actions.
1. Filter down
Open Findings and pick a category tab. These filters are available:
| Filter | Use it to |
|---|---|
| Severity | Start at the top |
| Status | Focus on open items, or bring back ignored ones |
| Type | Split a tab, such as CI workflow under Misconfiguration |
| Category | Narrow to one scanner category, such as Code Security · Dependencies (SCA) |
| Check | Show or hide specific rules |
| Resource type | Stay within code, artifacts or cloud |
| In current version | Skip problems only older versions have |
| Resource | Stay on one resource |
Set In current version to Yes first. It removes work on code you no longer ship.
The Check filter is the one people miss. Choose is none of to hide a noisy rule for this view, without changing anything for anyone else.
2. Decide on one finding
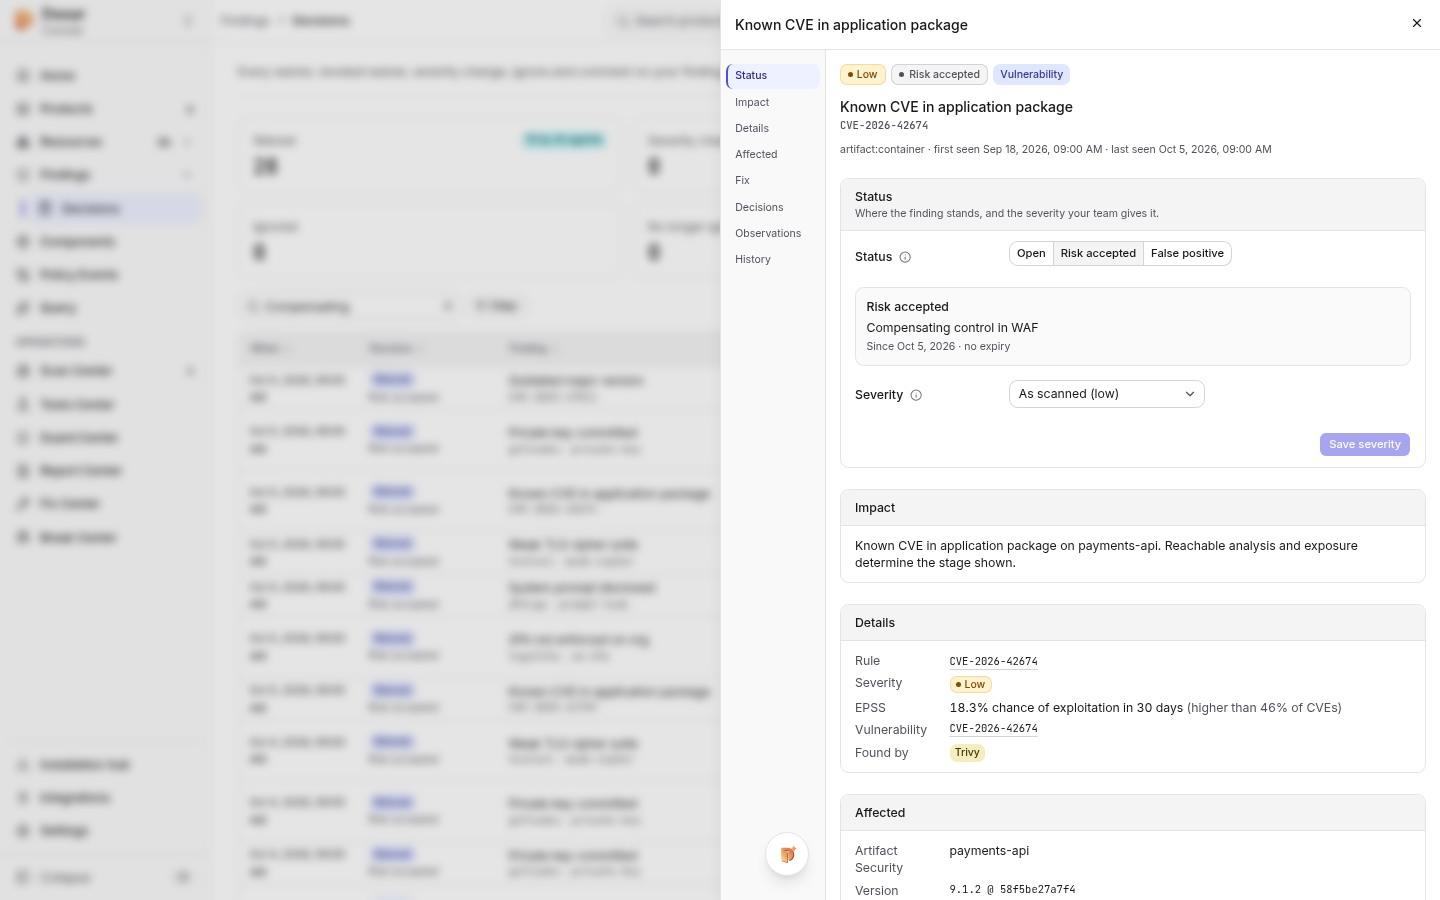
Select a row. The panel opens on the right, taking half the screen on a desktop. Its sections run top to bottom:
| Section | What it holds |
|---|---|
| Status | The finding's status and severity, and where you change them |
| Impact | What the problem is |
| Details | Rule, Severity, EPSS, CISA KEV, Vulnerability, Weakness and Found by |
| References | The first three links, then "+N more" |
| Affected | The resource, the version and where the problem sits |
| Fix | Dwaar's recommendation, a prompt for a coding agent, and the commands |
| Decisions | Every waiver, revoked waiver, severity change, ignore and comment, and the comment box |
| Observations | What each scan run said about it, newest first |
| History | Found, fixed, reopened, and the scan's own severity changes |
On a wide screen, a strip on the left of the panel lists these sections. Select one to jump to it; the section you are reading is highlighted.
Long sections fold to the same height. Select View more to open one in place, and Show less or Esc to fold it again. Esc closes the panel only when nothing is open.
Read Impact, then Observations. Then choose one of three outcomes.
Fix it
The Fix section shows Dwaar's recommendation: a one-line summary, such as "Upgrade curl from 8.9.0 to 8.11.1.", the steps to get there, and a prompt for a coding agent. Copy the prompt with the button on its code block.
| Finding | What the steps say |
|---|---|
| Vulnerability | Upgrade the package, in every lockfile that pins it. Override it when it comes in through another dependency, and rebuild the image for a container. |
| Secret | Revoke and rotate it, move it to a secret manager, and remove it from the history |
| Posture or misconfiguration | Change the setting |
| Anything else | Fix the location so the check passes |
The last step is always the same: build, test and merge. Rescan if you want to check at once.
The copied prompt holds the finding's facts, the numbered steps and the Dwaar finding id. It tells the agent to change the code, and not to suppress, waive or ignore the finding. It never includes the scanner's own description or evidence, because a coding agent would treat text from a scanned repository as instructions.
Once the fix ships, the next run of the current version stops seeing the finding and moves it to Fixed. You don't have to close anything by hand.
The Fix section also holds the commands: Ignore this check, Change severity of this check, Open PR, Rotate secret and Create ticket.
Opening a pull request, rotating a secret and creating a ticket from a finding are in preview.
Waive it
Waive a finding when you've decided not to act, and you can say why.
- In the Status section, choose Risk accepted or False positive.
- Enter a Reason. It's shown on the finding and in Findings › Decisions, and kept in the audit log.
- For Risk accepted, check Expires on. It starts at 90 days, and you can clear it.
- Select Save status.
You should see the status change. After the expiry date the finding counts as open again. To open it sooner, choose Open, say in Reason why the waiver no longer holds, and select Save status.
Always set an expiry on accepted risk. The reason you accepted it today won't hold forever, and the expiry is what makes someone look again.
Fixed and Ignored can't be chosen. A scan sets Fixed, and Scan Center › Configurations sets Ignored. The panel shows them read-only and says why, with a link to Ignore Files or Ignore Checks for an ignored finding.
Change its severity
The scanner doesn't know your environment. When its severity is wrong for you, change it.
- In the Status section, choose a new value under Severity, or choose the scan's own value to clear your change.
- A Reason box appears. Say why this severity fits the finding here, for example what limits the impact.
- Select Save severity.
The panel shows both the scanner's severity and yours. To re-grade a rule everywhere and not just here, select Change severity of this check in the Fix section. A severity a person sets on one finding always wins over a check's severity.
Comment on it
When you've looked but can't decide yet, leave a note for the next person. In the panel's Decisions section, write in the comment box and select Add comment. Comments are permanent: nobody can edit or delete one, and they hold up to 4,000 characters.
3. Handle noisy rules once
If you keep waiving the same rule, stop. Select Ignore this check on any of its findings. Its current findings become ignored in every organization, and later scans keep them ignored. You'll be asked to confirm, and the dialog tells you how many findings it affects.
Ignoring a check is a big hammer. Use it for rules that don't apply to you at all. Use a waiver when the decision is about one finding. Ignore findings covers how to undo it.
What you should see
The open counts on the tabs go down, and each decision appears under Decisions in the finding's panel. Nothing disappears silently.
Each entry in Decisions says when it was made, who made it, or Dwaar for the scan pipeline, and the reason. A badge says through what: Console, AI agent (MCP) with the name of the agent's API key, such as "Claude Code (MCP)", or API key for a script. Findings › Decisions lists the same decisions across all your findings.
Let an AI agent triage
A coding agent connected to the MCP server with Read and write can waive, revoke waivers, change severity and comment, with your findings:update. It must give a reason of at least 20 characters, and Dwaar tells it to name the evidence it checked. Its decisions carry the AI agent (MCP) badge, so you can review them in Findings › Decisions. See What the agent can and cannot do.
Try this next
Review your waivers before they expire. Filter Status to Risk accepted, read the reasons, and ask whether each one is still true. If you can't tell, the reason wasn't good enough, so write a better one on the next waiver.