Quickstart
You have a work email and no idea what is in your repositories. By the end of this page you will be signed in, with a list of your repositories, a scan running against each, and real findings to read.
Rather start from your coding agent? Paste Connect me to Dwaar (docs.dwaar.ai) into it, or see Connect a coding agent. It takes you through the same sign-in, and the same first connection, from chat.
Once you are in, source control comes first, on purpose. Discovery reads your repositories to find what you ship, and nothing else in the console has much to say until it has.
Prerequisites
- An email address at your company's own domain. Personal addresses, such as Gmail, are refused.
- If your company already uses Dwaar, an invite from one of its administrators.
- Permission to create a connection. See roles and permissions if the button is missing.
- A credential for your source control provider. For GitHub, a fine-grained token with read access to Metadata and Contents is enough to begin.
Step 1: Sign in
- Open your console's sign-in page and choose Continue. New to Dwaar? Choose Create an account instead, then Continue.
- Sign in with your email, Google or GitHub. Whichever you pick, it has to be your work email address. The first time, you also accept the terms of use and the privacy policy.
If an administrator invited you, you land in the console with the access they gave you. Skip to Step 2.
Otherwise a welcome screen says where you stand:
| You see | Why | What to do |
|---|---|---|
| Create your organization | Nobody from your email domain uses Dwaar yet. | Create it, as below. |
| Ask for an invite | Your company already uses Dwaar, and nobody has invited you. | Ask one of its administrators for an invite, then sign in again. |
| Choose an organization | You belong to more than one tenant. | Pick the one to work in. You choose again at every sign-in. |
| Use your organization email | You signed in with a personal address. | Choose Sign out, then sign in with your work email. |
A console set up for a single company also refuses every other domain, and names the one it expects.
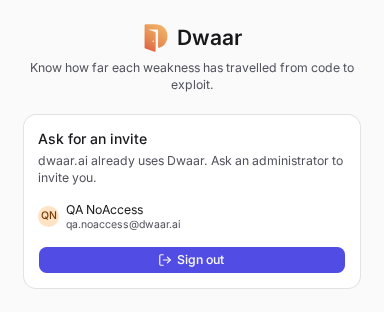
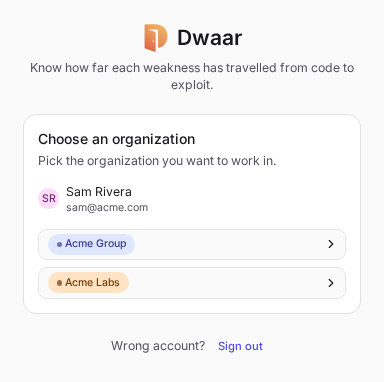
To create your organization:
- Enter the Organization name. Your company's name is the usual choice.
- Read the confirmation before you tick it. It says you are authorized to administer your domain's tenant, that you become its administrator, and that everyone else at your domain needs your approval to join.
- Choose Create organization.
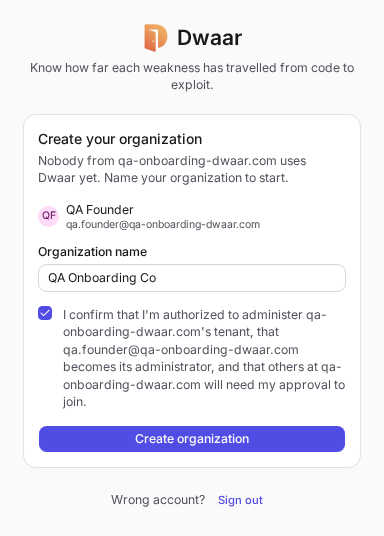
You are now the first administrator of a new tenant. The organization you named is its root organization: everything you add later in Organizations sits under it. Colleagues from your domain who sign in from now on see Ask for an invite, and Step 6 is how you let them in.
The welcome screen lasts 15 minutes. Act on it after that and it sends you back to sign in again. If sign-in returns you with a message instead, Troubleshooting explains each one.
Step 2: Connect source control
- Open Integrations in the left rail, and choose GitHub.
- Start a new connection. The drawer has two steps, Connection and Discovery.
- Name the connection after the organization it covers. You will thank yourself when you add a second one.
- Enter the organization and the token, then run the credential test.
The test is there to save you from waiting on a discovery that was never going to work, so do not skip it. Source control lists what every provider and method needs.
Step 3: Choose what to discover
The Discovery step decides what Dwaar reads from this connection.
- Leave Scope on All for your first run. You want to be surprised by what is there.
- Keep Skip archived and Skip forks on. Archived repositories rarely ship, and forks of other people's code are usually not yours to fix.
- Pick a Frequency. This matters more than it looks: discovery is the only schedule. Every discovery lists the connection and queues the scans that are due, so there is no separate scan schedule to configure.
- Choose Save.
Step 4: Watch the first scans
Saving starts the first discovery straight away.
- Open Scan Center. The queue shows what is upcoming, running and done.
- Open Resources, then Code Security, and find your repositories arriving.
A queued run that is not moving is usually waiting its turn, because your tenant has a cap on running scans. The run says so when that is the reason.
Step 5: Read your findings
Once a run completes, open Findings. This is the page you will live in.
Start with the highest severity, open a finding, and read where it is and how to fix it. Then decide: fix it, accept the risk with a reason, or mark it a false positive. Triage findings walks through each of those.
Your tests and fixtures probably contributed some noise. That is normal, and ignoring findings deals with it in one place rather than one finding at a time.
Step 6: Invite the person who fixes things
Findings that only the security team can see do not get fixed. Open Settings, then Members, and choose Invite member. Give them a role on the organizations they work on, not on everything: Members and groups walks through it. Invites only go to addresses at your company's email domain.
Try this next
Connect a container registry next, and compare what is in your images with what is in your repositories. Base images usually bring in plenty you never chose. Or connect your coding agent and ask it to fix the worst finding in the repository you work on.