Deploy an outpost
You have a host that meets Plan an outpost, you have picked a deployment with Choose a deployment, and you want an outpost running. Deploying one is four steps in the console and a handful of commands on the host. Most of the wait is the first pull of the outpost's image.
Prerequisites
- A Dwaar role that holds
outposts:create, such as Security admin, to create the token. Without it the steps still show, with a placeholder where the token goes, so you can hand them to someone who has it. - The host: Linux, Docker Engine 20.10 or later, root, and the outbound access listed in Plan an outpost.
The Deploy outpost drawer
Open Scan Center, then Outposts, and choose Deploy outpost. The same drawer opens from Installation hub, then Outpost.
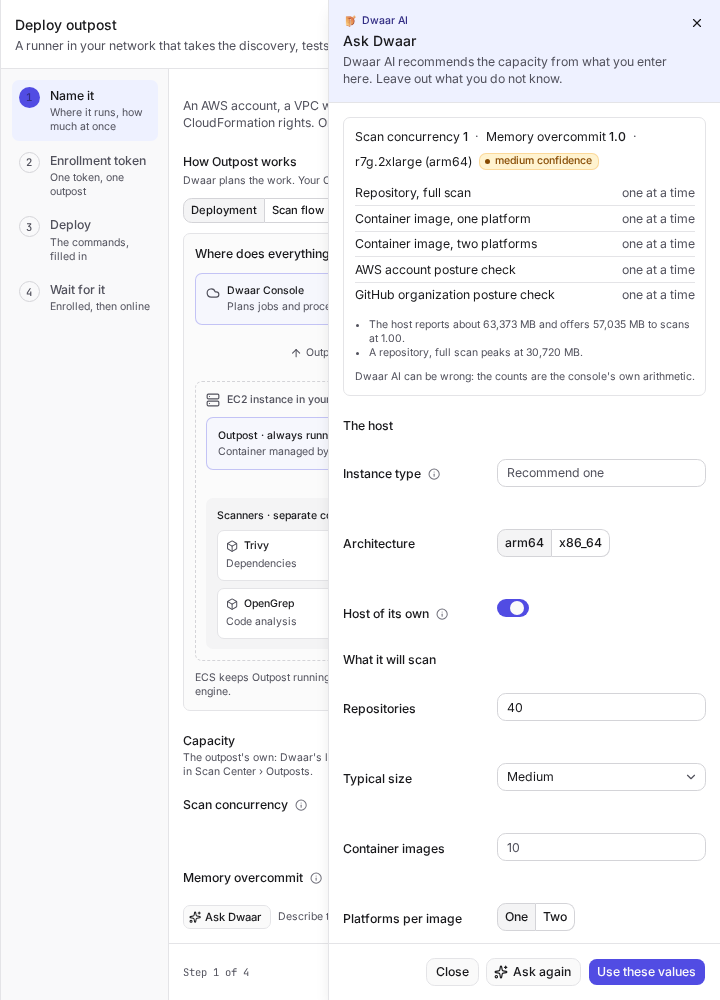
- Name it. Give the outpost the name you will read in every list, such as the host's name: up to 100 letters, digits, dots, dashes and underscores, starting with a letter or digit. Under Runs on, choose Linux host, Docker, Compose or AWS ECS. The drawer lists what each one needs. Under Capacity, set Scan concurrency and Memory overcommit, or keep the defaults of 2 and 1.0. Ask Dwaar recommends values from a description of the host and what it will scan, and shows how many scans of each kind fit at them. See Plan an outpost.
- Enrollment token. Choose Create enrollment token. The token is shown once, so copy it now, or leave it filled into the next step. It works once and for one hour, and carries the name, the placement and the capacity you chose. Closing the drawer does not cancel it: it stays under Pending enrolments in the Outposts tab until it is spent or expires. Cancel this token cancels it. If it expires while the drawer is open and nothing has enrolled with it, the drawer creates a new one and says so: copy the commands again. If you go back and change the name, the placement or the capacity after creating the token, the drawer says the token carries the earlier choices and will not show the deploy step until you choose Replace token, which cancels the old token and fills in a new one, or Keep the token's choices.
- Deploy. The commands for the placement you chose, with your console's address, the token, the name and the current outpost version filled in. Run them on the host. They are the same as the ones below. For AWS ECS, follow Deploy on AWS ECS.
- Wait for it. The drawer watches for the outpost and moves from Waiting to enroll to Enrolled to Online. An outpost sends its first heartbeat within 30 seconds of starting. The drawer stops checking after 15 minutes. Choose Check again once the outpost is running.
Prefer the commands the drawer shows you. They carry your console's address, which the examples below write as <console-url>, and the current outpost version. The examples pin version 0.1.3.
What the token does
The token carries the name, the placement and the capacity you chose. The outpost's name is --name or OUTPOST_NAME when given, else the token's name, else, when it enrolls again, its previous name, else the host's name.
The token is only a way in. On its first start the outpost spends it and receives a credential of its own, which it keeps in /var/lib/outpost/outpost.json on the host. From then on the token is worthless, and the credential is what you revoke if you ever need to. Keep /var/lib/outpost: an outpost that loses it cannot come back with the spent token and needs a new one.
Linux host with systemd
The outpost runs as a service beside Docker. Choose this when you manage hosts with systemd and would rather not run a container that holds the Docker socket.
-
Copy the outpost binary out of its image. Docker picks the build for the host's architecture.
docker create --name outpost-binary ghcr.io/dwaarai/outpost:0.1.3docker cp outpost-binary:/usr/local/bin/outpost ./outpostdocker rm outpost-binary -
Save this unit as
outpost.servicebeside it.[Unit]Description=Dwaar OutpostDocumentation=https://docs.dwaar.aiAfter=network-online.target docker.serviceWants=network-online.targetRequires=docker.service[Service]Type=simpleExecStart=/usr/local/bin/outpost run --config /var/lib/outpost/outpost.json --scan-root /var/lib/outpost/scans# Optional: HTTPS_PROXY, NO_PROXY and other OUTPOST_ variables in /etc/default/outpost.EnvironmentFile=-/etc/default/outpostRestart=on-failureRestartSec=10# Exit status 3: Dwaar refused the credential (revoked) or the enrollment token for good.# Restarting cannot help: set a new token in /etc/default/outpost, then restart.RestartPreventExitStatus=3# SIGTERM drains running scans (--drain, 5 min) before their containers are stopped.KillSignal=SIGTERMTimeoutStopSec=360StateDirectory=outpostStateDirectoryMode=0700NoNewPrivileges=yesProtectSystem=strictReadWritePaths=/var/lib/outpost /run/docker.sockProtectHome=yesPrivateTmp=yes[Install]WantedBy=multi-user.target -
Install, enroll and start it.
sudo install -m 0755 outpost /usr/local/bin/outpostsudo outpost enroll --console <console-url> --token <enrollment-token> --name <outpost-name>sudo install -m 0644 outpost.service /etc/systemd/system/sudo systemctl daemon-reload && sudo systemctl enable --now outpostsudo outpost statusoutpost statusonly reads: it checks the console and Docker and prints the settings that apply, without counting as a heartbeat. If you run it before the service starts, the outpost stays at Waiting for first heartbeat.
Behind a proxy, put HTTPS_PROXY= and NO_PROXY= lines in /etc/default/outpost before you start it. Behind a TLS inspecting proxy, add --ca-file /path/to/ca.pem to the enroll command.
On a host, the outpost serves each scan's credentials on the address of that scan's Docker network. Leave the host firewall's default of letting Docker's bridges reach the host.
Set Scan concurrency and Memory overcommit in the console. To change another setting, such as --job-disk-mb, override the start command with sudo systemctl edit outpost:
[Service]
ExecStart=
ExecStart=/usr/local/bin/outpost run --config /var/lib/outpost/outpost.json --scan-root /var/lib/outpost/scans --job-disk-mb 8192
A --max-jobs or --memory-overcommit added here overrides the console's value on this host, and the pane then shows it as set on the host.
Docker
The outpost runs as a container beside the host's Docker, with the socket mounted. Choose this for a quick start on a host where you already run containers by hand.
sudo mkdir -p /var/lib/outpost
docker run --rm -v /var/run/docker.sock:/var/run/docker.sock -v /var/lib/outpost:/var/lib/outpost \
  ghcr.io/dwaarai/outpost:0.1.3 enroll --console <console-url> --token <enrollment-token> --name <outpost-name>
docker run -d --name dwaar-outpost --restart unless-stopped --stop-timeout 360 \
  -v /var/run/docker.sock:/var/run/docker.sock -v /var/lib/outpost:/var/lib/outpost \
  ghcr.io/dwaarai/outpost:0.1.3 run
The first command enrolls and writes the credential. The second runs the outpost.
Behind a proxy, add -e HTTPS_PROXY -e NO_PROXY to both commands so the container takes them from your shell. Behind a TLS inspecting proxy, mount the CA into the first container and add --ca-file with its path inside the container to enroll. To change another setting, such as --job-disk-mb, add it after run in the second command. --max-jobs and --memory-overcommit there override the console's values.
Mount /var/lib/outpost at the same path inside and outside the container. The outpost writes each scan's directories there and asks the host's Docker to mount them into the analyzers by that path. A different path inside the container breaks every scan.
Docker Compose
The outpost runs from two files and enrolls itself on its first start. Choose this for a host you want to manage as configuration.
Save a .env in an empty directory:
OUTPOST_CONSOLE=<console-url>
OUTPOST_ENROLLMENT_TOKEN=<enrollment-token>
OUTPOST_NAME=<outpost-name>
Save docker-compose.yml beside it:
name: dwaar-outpost

services:
  outpost:
    image: ${OUTPOST_IMAGE:-ghcr.io/dwaarai/outpost:0.1.3}
    restart: unless-stopped
    command: ["run"]
    environment:
      # Capacity comes from the console (the outpost's Scan concurrency and memory overcommit).
      # Set either here only to override the console's value on this host; empty follows the console.
      OUTPOST_MAX_JOBS: ${OUTPOST_MAX_JOBS:-}
      OUTPOST_MEMORY_OVERCOMMIT: ${OUTPOST_MEMORY_OVERCOMMIT:-}
      # First start only: with no /var/lib/outpost/outpost.json yet, `run` enrolls with these.
      OUTPOST_CONSOLE: ${OUTPOST_CONSOLE:-}
      OUTPOST_ENROLLMENT_TOKEN: ${OUTPOST_ENROLLMENT_TOKEN:-}
      OUTPOST_NAME: ${OUTPOST_NAME:-}
      # Outbound through a proxy (optional).
      HTTPS_PROXY: ${HTTPS_PROXY:-}
      NO_PROXY: ${NO_PROXY:-}
    volumes:
      - /var/run/docker.sock:/var/run/docker.sock
      - /var/lib/outpost:/var/lib/outpost
      # A TLS inspecting proxy's CA: enroll with --ca-file /etc/outpost/ca.pem
      # - ./ca.pem:/etc/outpost/ca.pem:ro
    # SIGTERM drains running scans (--drain, 5 min) before their containers are stopped.
    stop_grace_period: 6m
    logging:
      driver: json-file
      options: { max-size: "20m", max-file: "5" }
Then start it:
sudo mkdir -p /var/lib/outpost
docker compose up -d
docker compose logs -f outpost
docker compose run --rm outpost status
The logs show outpost.enrolled, then outpost.starting. Heartbeats are not logged: the outpost turning Online in the console is the sign they arrive. Once it is online, delete the OUTPOST_ENROLLMENT_TOKEN line from .env. It is spent, and a later start ignores it anyway. Keep OUTPOST_NAME: if you ever enroll this host again, the name stays the one you chose.
Behind a TLS inspecting proxy, uncomment the CA mount and enroll before the first up, instead of letting it enroll itself:
docker compose run --rm outpost enroll --console <console-url> --token <enrollment-token> --name <outpost-name> --ca-file /etc/outpost/ca.pem
Two outposts on one host
name: dwaar-outpost and /var/lib/outpost are fixed names, which is right on a host of its own. To run a second outpost on the same host, give it its own directory and change four things together: the name: at the top, both sides of the /var/lib/outpost volume, and --config and --scan-root on its command line, all pointing into the new directory. docker compose run --rm outpost status then needs the same --config. Each outpost offers scans the whole host's memory and does not know about the other, so keep their Scan concurrency low enough that both together fit. A host of its own for each is simpler.
Name it well
The name is what every list, the queue's Runs on column and the connect form's picker show. Name the outpost after where it sits and what it reaches, such as dc1-gitlab-runner or prod-eu-aws, not after a person or a ticket. Two outposts can share a name, so a name that says where it runs is the one thing that tells them apart in Runs on.
Settings
The commands above run the outpost with the capacity you chose in the drawer, two scans at once and memory overcommit 1.0 unless you changed them, and with four discovery and test jobs at once. Change the capacity later in the outpost's pane. Every other setting is a flag of outpost run. See Settings for the list, and Plan an outpost before you change the memory ones.
What you should see
Under Scan Center, then Outposts, the outpost shows as Online, with its version and what it has free under Free now. Its pane shows how it was deployed under Deployed with, and the AWS identity of its host under AWS identity. If it stays at Waiting for first heartbeat, run has not started. If it never appears, it did not enroll. For either, read the host's logs and see Troubleshooting.
Try this next
An online outpost does nothing until a connection is bound to it. Follow Bind connections with one connection, run Test connection, and watch the job appear in the outpost's Live jobs.